
This blog is for Eclipse Che 7 (Kubernetes-Native in-browser IDE) on AWS with EFS Integration.

Eclipse Che makes Kubernetes development accessible for developer teams, providing one-click developer workspaces and eliminating local environment configuration for your entire team. Che brings your Kubernetes application into your development environment and provides an in-browser IDE, allowing you to code, build, test and run applications exactly as they run on production from any machine.
How Eclipse Che Works
- One-click centrally hosted workspaces
- Kubernetes-native containerised development
- In-browser extensible IDE
Here we will go through how to installing Eclipse Che 7 on AWS Cloud, which focuses on simplifying writing, building and collaborating on cloud native applications for teams.
Prerequisites
- A running instance of Kubernetes, version 1.9 or higher.
- The kubectl tool installed.
- The chectl tool installed
Installing Kubernetes on Amazon EC2
- Launch a minimum sized linux Ec2 instance, say like t.nano or t3 micro
- Set up the AWS Command Line Interface (AWS CLI). For detailed installation instructions, see Installing the AWS CLI.
- Install Kubernetes on EC2. There are several ways to have a running Kubernetes instance on EC2. Here, the kops tool is used to install Kubernetes. For details, see Installing Kubernetes with kops. You will also need kubectl to install kops which can be found at Installing kubectl
- Create a Role with Admin privileges and attach it to the EC2 instance where kops is installed. This role will be creating kubernetes cluster with master, nodes with autoscaling groups, updating route53, creating load balancer for ingress. For detailed instructions, see Creating Role for EC2
So to summarise, so far we have installed aws cli, kubectl, kops tool and attached AWS admin role to EC2 instance.
Next, We need route53 records which kops can use to point kubernetes api, etcd…
Throughout the document, I will be using eclipse.mydomain.com as my cluster domain.
Now, let’s create public hosted zone for “eclipse.mydomain.com” in Route53. Once done, make a note of zone id which will be used later
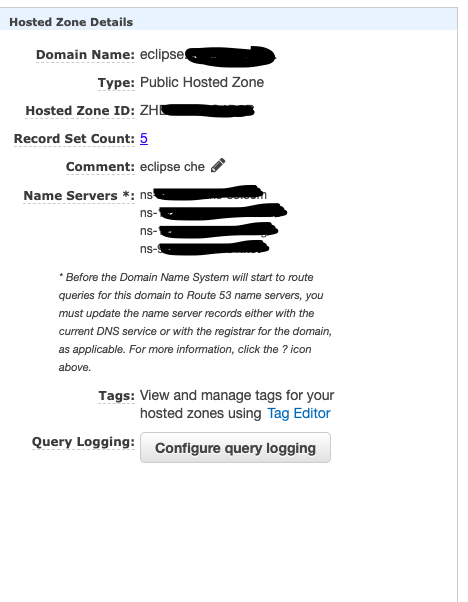
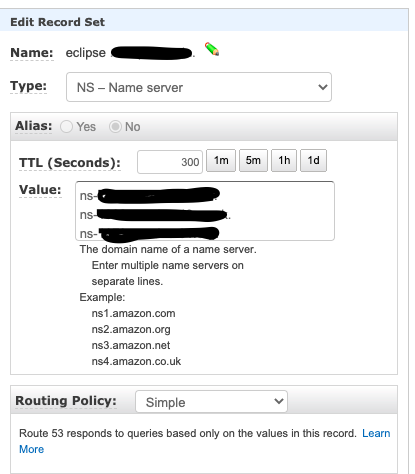
Copy the four DNS nameservers on the eclipse.mydomain.com hosted zone and create a new NS record on mydomain.com and update the above copied DNS entries. Note that when using a custom DNS provider, updating the record takes a few hours.
Next, Create the Simple Storage Service (s3) storage to store the kops configuration.
$ aws s3 mb s3://eclipse.mydomain.com
make_bucket: eclipse.mydomain.com
Inform kops of this new service:
$ export KOPS_STATE_STORE=s3://eclipse.mydomain.com
Create the kops cluster by providing the cluster zone. For example, for Mumbai region, the zone is ap-south-1a.
$ kops create cluster --zones=ap-south-1a apsouth-1a.eclipse.mydomain.comThe above kops command will create new VPC with CIDR 172.20.0.0/16 and new subnet to install nodes and master in kubernetes cluster and will use Debian OS by default. Incase you want to use your own existing VPC, Subnet and AMI, then use below command:
$ kops create cluster --zones=ap-south-1a apsouth-1a.eclipse.mydomain.com --image=ami-0927ed83617754711 --vpc=vpc-01d8vcs04844dk46e --subnets=subnet-0307754jkjs4563k0The above kops command uses ubuntu 18.0 AMI to be used for master and worker nodes. You can add your own AMIs as well.
You can review / update the cluster config for cluster, master and nodes using below commands
For cluster —
$ kops edit cluster — name=ap-south-1a.eclipse.mydomain.comFor master —
$ kops edit ig — name=ap-south-1a.eclipse.mydomain.com master-ap-south-1aFor nodes —
$ kops edit ig — name=ap-south-1a.eclipse.mydomain.com nodesOnce the cluster, master, node config is reviewed and updated , you can create cluster using following command
$ kops update cluster --name ap-south-1a.eclipse.mydomain.com --yesAfter the cluster is ready, validate it using:
$ kops validate cluster

Using cluster from kubectl context: ap-south-1a.eclipse.mydomain.com

Validating cluster eclipse.mydomain.com
INSTANCE GROUPS
NAME                ROLE    MACHINETYPE  MIN  MAX  SUBNETS
master-ap-south-1a   Master  m3.medium    1    1    eu-west-1c
nodes               Node    t2.medium    2    2    eu-west-1c

NODE STATUS
NAME                                         ROLE    READY
ip-172-20-38-26.ap-south-1.compute.internal   node    True
ip-172-20-43-198.ap-south-1.compute.internal  node    True
ip-172-20-60-129.ap-south-1.compute.internal  master  True

Your cluster is ap-south-1a.eclipse.mydomain.com ready
It may take approx 10 -12 min for cluster to come up.
Check the cluster using the kubectl command. The kubectl context is also configured automatically by the kops tool:
$ kubectl config current-context
ap-south-1a.eclipse.mydomain.com
$ kubectl get pods --all-namespaces

All the pods in the running state are displayed.
Installing Ingress-nginx
To install Ingress-nginx:
- Install the ingress nginx configuration from the below github location.
$ kubectl apply -f https://raw.githubusercontent.com/binnyoza/eclipse-che/master/mandatory.yaml2. Install the configuration for AWS.
$ kubectl apply -f https://raw.githubusercontent.com/binnyoza/eclipse-che/master/service-l4.yaml

$ kubectl apply -f https://raw.githubusercontent.com/binnyoza/eclipse-che/master/patch-configmap-l4.yaml
The following output confirms that the Ingress controller is running.
$ kubectl get pods --namespace ingress-nginx
NAME                                        READY   STATUS    RESTARTS   AGE
nginx-ingress-controller-76c86d76c4-gswmg   1/1     Running   0          9m3s
If the pod is not showing ready yet, wait for couple of minutes and check again.
3. Find the external IP of ingress-nginx.
$ kubectl get services --namespace ingress-nginx -o jsonpath='{.items[].status.loadBalancer.ingress[0].hostname}'
Ade9c9f48b2cd11e9a28c0611bc28f24-1591254057.ap-south-1.elb.amazonaws.comTroubleshooting: If the output is empty, it implies that the cluster has configuration issues. Use the following command to find the cause of the issue:
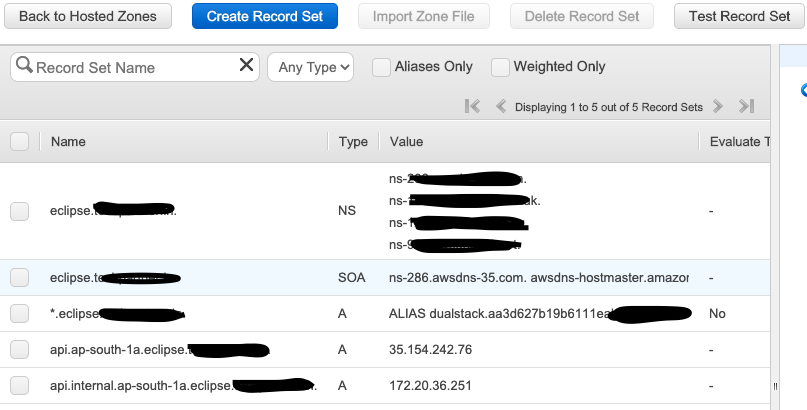
$ kubectl describe service -n ingress-nginx ingress-nginx4. Now in Route53, create a wildcard record in zone eclipse.mydomain.com with the record as LB url as received in previous kubectl get services command. You can create CNAME record or Alias A record.
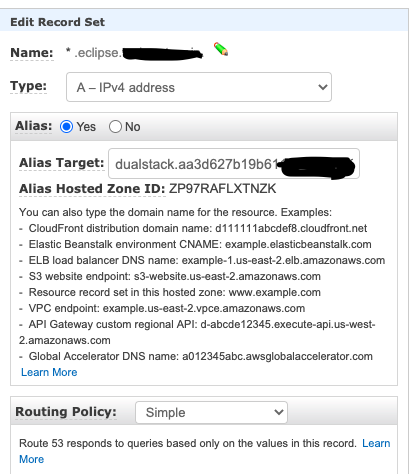
The following is an example of the resulting window after adding all the values.
It is now possible to install Eclipse Che on this existing Kubernetes cluster.
Enabling the TLS and DNS challenge
To use the Cloud DNS and TLS, some service accounts must be enabled to have cert-manager managing the DNS challenge for the Let’s Encrypt service.
- In the EC2 Dashboard, identify the IAM role used by the master node and edit the same. Add the below inline policy to the existing IAM role of the master node and name it appropriately like eclipse-che-route53.
{
    "Version": "2012-10-17",
    "Statement": [
        {
            "Effect": "Allow",
            "Action": [
                "route53:GetChange",
                "route53:ListHostedZonesByName"
            ],
            "Resource": [
                "*"
            ]
        },
        {
            "Effect": "Allow",
            "Action": [
                "route53:ChangeResourceRecordSets"
            ],
            "Resource": [
                "arn:aws:route53:::hostedzone/<INSERT_ZONE_ID>"
            ]
        }
    ]
}
Update the DNS Zone ID copied earlier while creating zone
Installing cert-manager
- To install cert-manager, run the following commands
$ kubectl create namespace cert-manager
namespace/cert-manager created
$ kubectl label namespace cert-manager certmanager.k8s.io/disable-validation=true
namespace/cert-manager labeled
2. Set validate=false. If set to true, it will only work with the latest Kubernetes:
$ kubectl apply \
  -f https://github.com/jetstack/cert-manager/releases/download/v0.8.1/cert-manager.yaml \
  --validate=false
3. Create the Che namespace if it does not already exist:
$ kubectl create namespace che
namespace/che created
4. Create an IAM user cert-manager with programatic access and below policy. Copy the Access key and Secret Access key generated for further use. This user is required to manage route53 records for eclipse.mydomain.com DNS validation during certificate creation and certificate renewal.
Policy to be used with cert-manager IAM user
{
    "Version": "2012-10-17",
    "Statement": [
        {
            "Effect": "Allow",
            "Action": "route53:GetChange",
            "Resource": "arn:aws:route53:::change/*"
        },
        {
            "Effect": "Allow",
            "Action": "route53:ChangeResourceRecordSets",
            "Resource": "arn:aws:route53:::hostedzone/*"
        },
        {
            "Effect": "Allow",
            "Action": "route53:ListHostedZonesByName",
            "Resource": "*"
        }
    ]
}
5. Create a secret from the SecretAccessKey content.
$ kubectl create secret generic aws-cert-manager-access-key \
  --from-literal=CLIENT_SECRET=<REPLACE WITH SecretAccessKey content> -n cert-manager
6. To create the certificate issuer, change the email address and specify the accessKeyID:
$ cat <<EOF | kubectl apply -f -
apiVersion: certmanager.k8s.io/v1alpha1
kind: ClusterIssuer
metadata:
  name: che-certificate-issuer
spec:
  acme:
    dns01:
      providers:
      - route53:
          region: eu-west-1
          accessKeyID: <USE ACCESS_KEY_ID_CREATED_BEFORE>
          secretAccessKeySecretRef:
            name: aws-cert-manager-access-key
            key: CLIENT_SECRET
        name: route53
    email: user@mydomain.com
    privateKeySecretRef:
      name: letsencrypt
    server: https://acme-v02.api.letsencrypt.org/directory
EOF
7. Add the certificate by editing the domain name value (eclipse.mydomain.com, in this case) and the dnsName value:
$ cat <<EOF | kubectl apply -f -
apiVersion: certmanager.k8s.io/v1alpha1
kind: Certificate
metadata:
 name: che-tls
 namespace: che
spec:
 secretName: che-tls
 issuerRef:
   name: che-certificate-issuer
   kind: ClusterIssuer
 dnsNames:
   - '*.eclipse.mydomain.com'
 acme:
   config:
     - dns01:
         provider: route53
       domains:
         - '*.eclipse.mydomain.com'
EOF
8. A new DNS challenge is being added to the DNS zone for Let’s encrypt. The cert-manager logs contain information about the DNS challenge.
9. Obtain the name of the Pods:
$ kubectl get pods --namespace cert-manager
NAME                                       READY   STATUS    RESTARTS   AGE
cert-manager-6587688cb8-wj68p              1/1     Running   0          6h
cert-manager-cainjector-76d56f7f55-zsqjp   1/1     Running   0          6h
cert-manager-webhook-7485dd47b6-88m6l      1/1     Running   0          6h
10. Ensure that the certificate is ready, using the following command. It takes approximately 4-5 min for the certificate creation process to complete. Once the certificate is successfully created, you will be below output.
$ kubectl describe certificate/che-tls -n che

Status:
  Conditions:
    Last Transition Time:  2019-07-30T14:48:07Z
    Message:               Certificate is up to date and has not expired
    Reason:                Ready
    Status:                True
    Type:                  Ready
  Not After:               2019-10-28T13:48:05Z
Events:
  Type    Reason         Age    From          Message
  ----    ------         ----   ----          -------
  Normal  OrderCreated   5m29s  cert-manager  Created Order resource "che-tls-3365293372"
  Normal  OrderComplete  3m46s  cert-manager  Order "che-tls-3365293372" completed successfully
  Normal  CertIssued     3m45s  cert-manager  Certificate issued successfully
Now that we have Kubernetes cluster, Ingress controller (AWS Load Balancer )and TLS certificate ready, we are ready to install Eclipse Che.
Installing Che on Kubernetes using the chectl command
chectl is the Eclipse Che command-line management tool. It is used for operations on the Che server (start, stop, update, delete) and on workspaces (list, start, stop, inject) and to generate devfiles.
Install chectl cli tool to manage eclipse che cluster. For installation instructions see, Installing chectl
You will also need Helm and Tiller. To install Helm you can follow instructions at Installing Helm
Once chectl is installed, you can install and start the cluster using below command.
chectl server:start --platform=k8s --installer=helm --domain=eclipse.mydomain.com --multiuser --tlsIf using without authentication, you can skip — multiuser and start cluster as below
chectl server:start --platform=k8s --installer=helm --domain=eclipse.mydomain.com --tls
✔ ✈️ Kubernetes preflight checklist
✔ Verify if kubectl is installed
✔ Verify remote kubernetes status...done.
✔ Verify domain is set...set to eclipse.mydomain.com.
✔ 🏃 Running Helm to install Che
✔ Verify if helm is installed
✔ Check for TLS secret prerequisites...che-tls secret found.
✔ Create Tiller Role Binding...it already exist.
✔ Create Tiller Service Account...it already exist.
✔ Create Tiller RBAC
✔ Create Tiller Service...it already exist.
✔ Preparing Che Helm Chart...done.
✔ Updating Helm Chart dependencies...done.
✔ Deploying Che Helm Chart...done.
✔ ✅ Post installation checklist
✔ PostgreSQL pod bootstrap
✔ scheduling...done.
✔ downloading images...done.
✔ starting...done.
✔ Keycloak pod bootstrap
✔ scheduling...done.
✔ downloading images...done.
✔ starting...done.
✔ Che pod bootstrap
✔ scheduling...done.
✔ downloading images...done.
✔ starting...done.
✔ Retrieving Che Server URL...https://che-che.eclipse.mydomain.com
✔ Che status check
Command server:start has completed successfully.
Now you can open Eclipse Che portal using URL —
https://che-che.eclipse.mydomain.com/
Eclipse che has 3 components — Che , plugin-registry and devfile-registry
Challenges
Each of these component have same versioning that goes hand in hand. For eclipse che cluster to function correctly, image used for che, plugin registry and devfile registry must have same version. The current latest version is 7.13.1.
However chectl have command line option to specify only che image version. Incase if you want to use higher version of Che cluster implementation, you will need to upgrade chectl to the respective version. For example, you will need chectl version 7.12.1 to install Che, plugin-registry and devfile-registry of version 7.12.1 and so on.
Advanced Eclipse Che Configuration
By default, Eclipse che uses “common” PVC strategy which means all workspaces in the same Kubernetes Namespace will reuse the same PVC
CHE_INFRA_KUBERNETES_PVC_STRATEGY: common
Hence the challenge posed is that while using multiple worker node cluster, when the workspace pods is launched on multiple worker node, it fails as it is not able to get the EBS volume which is already mounted on other node.
Other option is to use ‘unique’ or ‘per-workspace’ which will create multiple EBS volumes to manage. Here the best solution would be to use a shared file system where we can use ‘common’ PVC strategy so that all workspaces are created under same mount.
We have used EFS as our preferred choice of its capabilities. More on EFS here
Integrating EFS as shared storage for use as eclipse che workspaces
Make EFS accessible from Node Instances. This can be done by adding node instances SG (this is created by KOPS cluster already) to SG of EFS
$ kubectl create configmap efs-provisioner --from-literal=file.system.id=fs-abcdefgh --from-literal=aws.region=ap-south-1 --from-literal=provisioner.name=example.com/aws-efsDownload EFS deploy file from below location using wget –
$ wget https://raw.githubusercontent.com/binnyoza/eclipse-che/master/efs-master.yamlEdit efs-master.yaml to use your EFS ID (edit is at 3 places). Also update the storage size for EFS to say 50Gi and apply using below command
kubectl create --save-config -f efs-master.yamlApply below configs
kubectl apply -f https://raw.githubusercontent.com/binnyoza/eclipse-che/master/aws-efs-storage.yaml
kubectl apply -f https://raw.githubusercontent.com/binnyoza/eclipse-che/master/efs-pvc.yaml
Verify using
kubectl get pv
kubectl get pvc -n che
Edit che config using below command and add below line
$ kubectl edit configmap -n che
   CHE_INFRA_KUBERNETES_WORKSPACE_PVC_STORAGEClassName: aws-efs
save and exit. Restart che pod using below command. Whenever any changes made to che configmap, restarting che pod is required.
$ kubectl patch deployment che -p "{\"spec\":{\"template\":{\"metadata\":{\"annotations\":{\"date\":\"`date +'%s'`\"}}}}}" -n cheCheck the pod running status using
$ kubectl get pods -n cheNow, you can start creating workspaces and your IDE Environment from URL —
https://che-che.eclipse.mydomain.com
Limitation
- Eclipse Che version 7.7.1 and below is unable to support more than 30 workspaces
- In case of multiple Che clusters, creating them in same VPC leads to failure of TLS certificate creation. These seems due to rate limits imposed by Lets Encrypt
Yay… Thanks for reading through 🙂
This article has been written by Binny Oza, Principal Devops Engineer at Techpartner. At Techpartner, we excel in providing simple solutions. For more, visit www.techpartner.in or contact us at info@techpartner.in.